
Tracks
Tracks are the rows of your project. Each one holds its own clips, its own sound, and its own place in the mix. This chapter covers every control on a track header.
The track types
NeonDAW has five kinds of track. Each holds a different kind of material.
| Type | What it holds |
|---|---|
| MIDI | Notes, played through an instrument. Record from a keyboard or draw notes in the piano roll. |
| Audio | Recorded takes and imported audio files. |
| Drum | Patterns stamped from the drum machine. |
| Video | A movie to score against. See Video & Scoring. |
| Group | A folder of tracks that is also a bus. See Track Groups. |
Every project also has a MASTER row. It is the master bus: everything flows through it on the way to your speakers. It is covered in The Mixer.
How to create a track
Click NEW TRACK above the track headers and pick a kind: MIDI Track, Audio Track, Drum Track, Video Track, or Group. You can also right-click any empty space in the header column for the same menu.
New tracks appear at the top of the list.
Rename, reorder, duplicate, delete
Rename
Click a track's name and type. Press Return or click anywhere else to commit.
Reorder
Drag a track's header up or down. A gap opens between the rows to show where it will land. Drop it under an open group header and it joins the group.
Duplicate
Right-click the header and choose Duplicate Track. The copy takes everything: clips, instrument, effects, automation, and the track's color.
Delete
Right-click the header and choose Remove Track. Deleting is undoable: ⌘Z brings the track back.
Collapse and expand
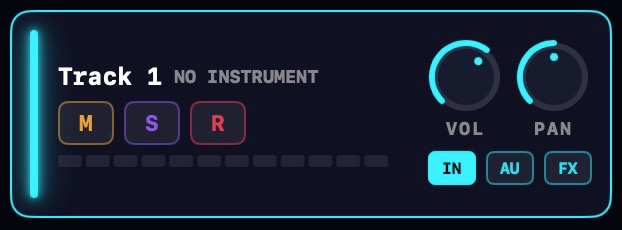

Click a track's color bar (the thin colored strip on the left edge) to collapse it to a slim row. Click it again to expand. A collapsed track folds its automation lanes away with it.
The button next to NEW TRACK collapses every track at once, or expands them all back.
You can also drag the bottom edge of a track's lane to make the row taller or shorter.
Mute, Solo and Arm
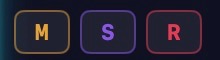
Every track header carries three small chips.
- M mutes the track. You will not hear it, and its clips dim in the arrangement.
- S solos the track. While anything is soloed, you hear only the soloed tracks.
- R arms the track for recording. See Recording Audio and Recording MIDI.
Drum tracks have no R chip: their clips come from the drum machine's ADD TO TRACK button, not from recording. Video tracks have no mix chips at all, just a WINDOW button that opens the video window.
On an audio track, right-click the R chip to toggle Input Monitoring. It is on by default: arming the track also lets you hear the input. More in Recording Audio.
Volume, pan and meters
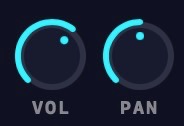
Each track header has a VOL knob and a PAN knob. Volume reaches up to +12 dB above unity, so a quiet source can get a clean boost. Right-click any knob to reset it.
Under the chips, every track shows its own level meter. On an armed audio track the meter also shows the live input, so you can set levels before you record.
The same controls appear as full strips in The Mixer, and both places move together.
Track colors
Every track type has a signature color, and every track can override it. Right-click a header and pick Track Color, then choose from the palette. Default returns the track to its type's color.
If several tracks are selected, the pick recolors all of them in one move.
To change the default color per track type, open Settings > General > TRACK COLORS.
Selecting multiple tracks
Three ways to build a selection:
- ⇧-click a header to select the whole range from the last selected track.
- ⌘-click a header to add or remove one track.
- Right-drag a box over the header column to sweep tracks into the selection. No modifier needed.
Acting on a multi-selection acts on every selected track: color, duplicate, and delete all apply to the whole set. The right-click menu also offers Group Selection, which folds the selected tracks into a new group.
IN, AU, & FX

The IN button: choosing the input
The IN chip in a track's header decides what the track listens to. The choices depend on the track type.
On MIDI tracks
- ALL INPUTS: the track plays from everything, the default.
- CHORD PAD: only the chord pad and the typing keyboard.
- MIDI IN: only hardware MIDI. Hover it to pick a channel filter, All or 1 to 16. A channel pick shows in the chip, like
IN 5. - NO INPUT: the track ignores live input.
On audio tracks
The IN menu picks the recording input: one of your input devices, or No Input. Picking a device makes it the Mac's default input and records the whole device.
On an interface with more than two inputs, the menu adds single channels and stereo pairs, like IN 3 or IN 1-2. Each armed track records its own slice, so several mics can track at once. More in Recording Audio.
The AU button: choosing the instrument
MIDI tracks carry an AU chip. Click it to open the track's instrument, or the instrument browser when the slot is empty. The instrument's name also shows next to the track name: NEONSYNTH, the plugin's name, or NO INSTRUMENT.
Right-click the AU chip for a quick-switch menu: Choose AU… opens the browser, and one entry per built-in instrument swaps it in directly, from NeonSynth to NeonHarp.
Every built-in and how to use third-party Audio Units: Instruments.
The FX button: opening the effect chain
The FX chip opens the track's effect chain window. When effects are loaded, the chip shows how many, like FX·2.
Groups and the master bus have the same button. Adding, ordering and bypassing effects is covered in Effects & FX Chains.