
Recording Audio
Plug in, arm a track, and press record. NeonDAW records every armed track at once, and you hear yourself through the track's own effects while the take itself stays clean.
Arm a track and record
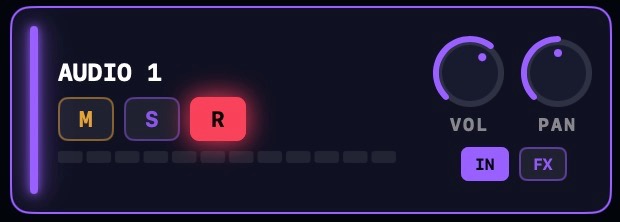
Every audio track has an R chip in its header. Click it to arm the track: the track becomes a recording target, and you start hearing its input.
Press the record button in the transport bar to start a take. The count-in clicks first, then recording begins exactly on the downbeat. Press record again, or stop the transport with Return or Space, to finish the take.
The count-in length is set in Settings · Metronome: OFF, 1 bar, or 2 bars. The count-in is always audible, even when the metronome is off.
macOS asks for microphone access before your first take. If you denied it, grant it in System Settings · Privacy & Security · Microphone.
Recording several tracks at once
Every armed audio track records together in the same take. Each track captures its own slice of the input device, so a bigger interface can track a whole band in one pass: give each track its own channel or pair, arm them all, and press record once.
Choosing the input per track
The IN button on an audio track picks what that track records:
- DEFAULT INPUT records the input device as it is.
- IN 1, IN 2, and so on record a single device channel: perfect for a close mic.
- IN 1-2 and other pairs record two neighboring channels as stereo. Pairs appear on interfaces with more than two inputs.
- NO INPUT keeps the track out of the take, even while armed.
NeonDAW follows the Mac's default input and output devices. Pick devices in System Settings, and check what is active in Settings · Audio & MIDI.
Channel picks are forgiving. If a track is set to IN 5 and you record on a two-input interface, the take records channel 1 instead of failing.
Input monitoring
Arming an audio track also monitors its input: you hear yourself live, through that track's own effect chain. To turn it off for one track, right-click the R chip and untick Input Monitoring.
Monitoring is wet, the take is dry. What you hear runs through the track's FX; what lands in the file is the clean input. You can sing into a big reverb and still change your mind about the reverb later.
Input gain and the level meter
Set the recording level in Settings · Audio & MIDI. The INPUT GAIN slider boosts the input by up to +48 dB, and the boost bakes into the take: the INPUT LEVEL meter shows exactly what a take would record.
Tap the mic button next to the meter to hear yourself while you set the gain. Back off if the meter hits red.
Input Boost During Recording
While a take rolls with monitoring on, NeonDAW gives the monitored input a small lift of 3 dB and steps the rest of the mix back by 2.5 dB, so it is easier to hear yourself sing or play over the arrangement.
Only what you hear changes. The take records the unlifted input, and your mix levels stay untouched. The option is on by default: turn it off in Settings · Audio & MIDI, under RECORDING. Toggling it during a take applies immediately.
Recording during the count-in
The count-in gives you the tempo before the take. The audio recording itself starts exactly on the downbeat.
Playing early is fine too: on armed instrument tracks, notes struck during the count-in are captured and land right at the start of the take. See Recording MIDI.
The take becomes a clip
The live take draws its waveform on the track while you record. When you stop, the finished take becomes a regular audio clip at the recording position: move it, trim it, and split it like any other clip. See Clips & the Arrangement.
24-bit recording
Takes record in 24-bit by default: the studio standard. Turn it off in Settings · General to record 16-bit and save disk space. Takes you already recorded keep their depth.
If the recording is silent or laggy
- Closed MacBook lid. The built-in mic is hard-muted while the lid is closed. Open the lid, or choose another input. The status readout in the transport bar tells you when this happens.
- Bluetooth headphones. Wireless audio adds 100 ms or more of delay that no setting can remove. NeonDAW warns when the output goes wireless. Record with wired headphones.
- Mic permission. If macOS never asked, or you said no, check System Settings · Privacy & Security · Microphone.
- Track setup. Make sure the track is armed and its IN pick matches the connected device.
More fixes live in Tips & Troubleshooting.